
原文链接:Claude Agent Skills: A First Principles Deep Dive
Claude 的 Agent Skills 系统是一套复杂的、基于提示词的“元工具”架构,通过注入专用指令来扩展 LLM 的能力。与传统的函数调用或代码执行不同,skills 通过提示词扩展与上下文修改来影响 Claude 处理后续请求的方式,而不是编写可执行代码。
这篇深度解析从第一性原理拆解 Claude 的 Agent Skills 系统,记录了名为 “Skill” 的工具作为元工具、负责把领域提示词注入对话上下文的架构。我们会以 skill-creator 与 internal-comms 两个技能为案例,走完整生命周期,从文件解析、API 请求结构,一直到 Claude 的决策过程。
Claude Agent Skills 概览
Claude 使用 Skills 来提升执行特定任务的效果。Skills 以文件夹形式定义,包含指令、脚本与资源,Claude 会按需加载。Claude 通过声明式、基于提示词的机制发现并调用技能。模型(Claude)会根据系统提示词中提供的技能文字描述来决定是否调用技能;在代码层面没有算法化的技能选择或 AI 意图检测。决策完全发生在 Claude 的推理过程中,依据技能描述做匹配。
Skills 不是可执行代码。它们不会运行 Python 或 JavaScript,也没有隐藏的 HTTP 服务或函数调用。技能也不是硬编码进 Claude 的系统提示词里,而是存在于 API 请求结构的另一部分。
那么 Skills 到底是什么?它们是专门的提示模板,用于向对话上下文注入领域指令。当技能被调用时,它会同时修改对话上下文(注入指令提示)与执行上下文(更改工具权限、可能切换模型)。技能不会直接执行动作,而是扩展成详细提示,引导 Claude 解决特定类型问题。每个技能会作为 Claude 看到的工具 schema 的动态补充出现。
当用户发起请求时,Claude 会收到三样东西:用户消息、可用工具列表(Read、Write、Bash 等)以及 Skill 工具。Skill 工具的描述包含了所有可用技能的格式化清单(name、description 等字段组合在一起)。Claude 阅读这份清单,用自身语言理解将意图与技能描述匹配。例如你说“帮我创建一个写日志的 skill”,Claude 会看到 internal-comms 技能描述(“When user wants to write internal communications using format that his company likes to use”),识别到匹配,然后调用 Skill 工具并传入 command: "internal-comms"。
术语说明:
- Skill 工具(S 大写)= 管理所有技能的元工具。它和 Read、Write、Bash 等并列出现在 Claude 的 tools 数组里。
- skills(s 小写)= 具体技能,如
skill-creator、internal-comms。这些是由 Skill 工具加载的专用指令模板。
下面是更直观的示意图:
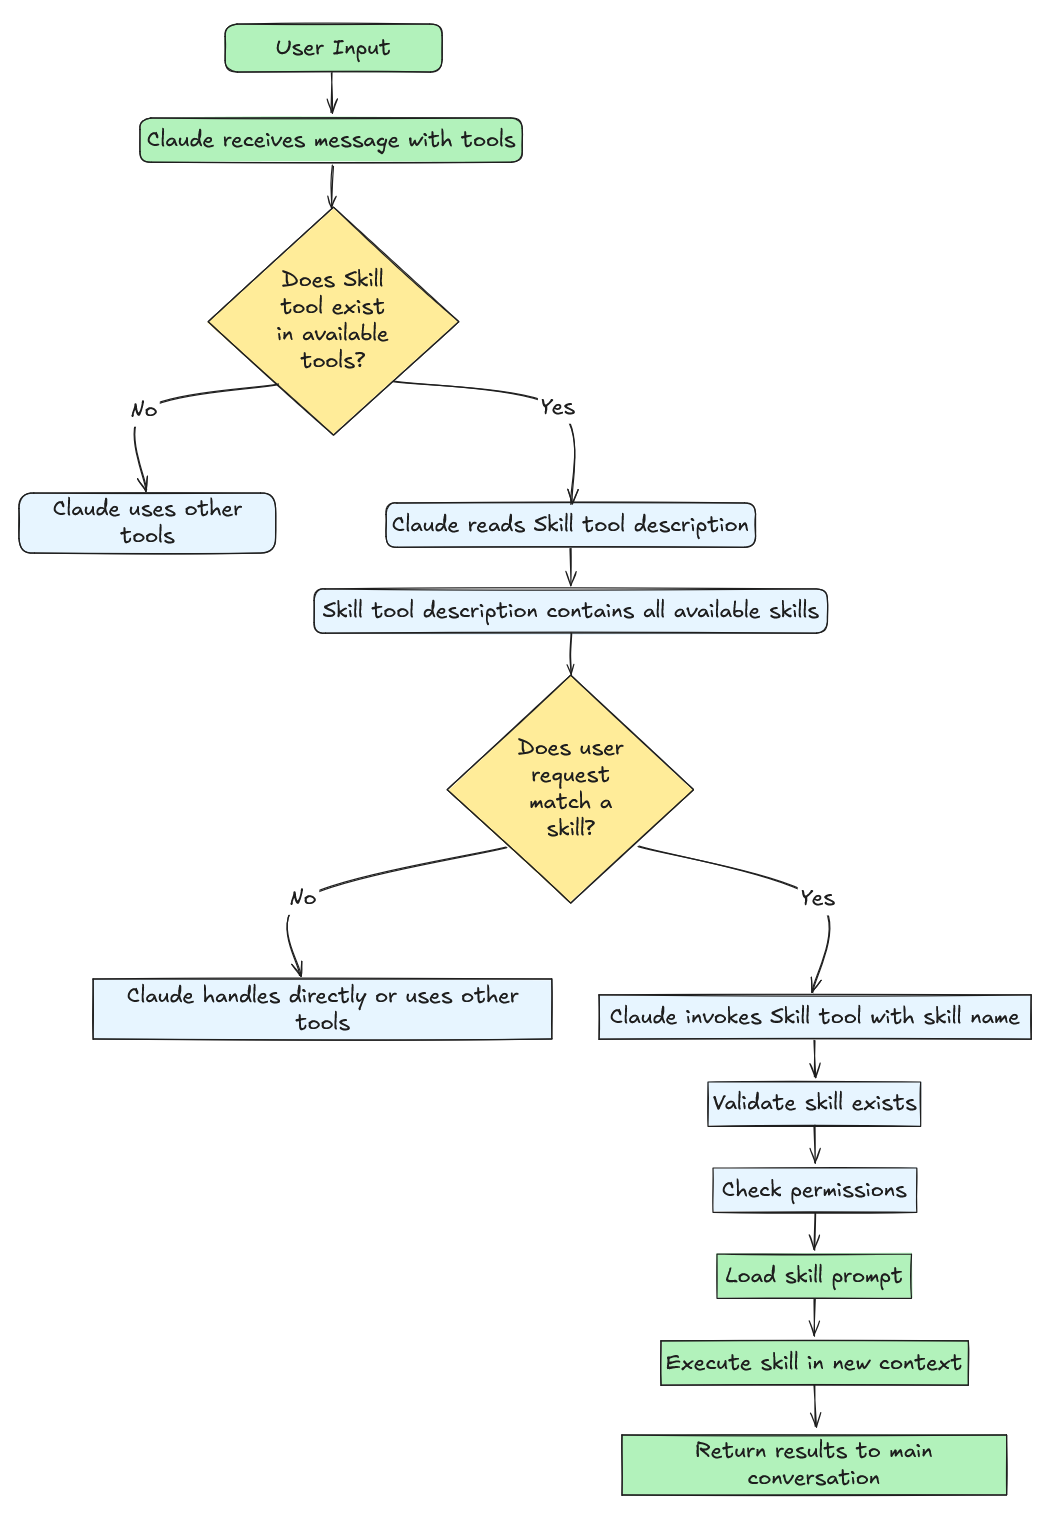
技能选择机制在代码层面没有算法化的路由或意图分类。Claude Code 不使用 embedding、分类器或模式匹配来决定调用哪个技能。系统只是把可用技能格式化成文本描述,嵌入 Skill 工具提示中,让 Claude 的语言模型自己做决定。这是纯粹的 LLM 推理:没有正则、没有关键词匹配、没有基于 ML 的意图检测。决策发生在 transformer 的前向计算里,而非应用代码中。
当 Claude 调用某个技能时,系统会执行一个简单流程:加载 SKILL.md、扩展为详细指令、把指令注入对话上下文作为新的 user message、修改执行上下文(允许的工具、模型选择),并在富化后的环境中继续对话。这与传统工具完全不同,后者执行并返回结果;skills 是准备 Claude去解决问题,而不是直接解决问题。
下面的表格对比了 Tools 与 Skills 的差异:
| 维度 | 传统工具 | Skills |
|---|---|---|
| 执行模型 | 同步、直接 | 提示词扩展 |
| 目的 | 执行具体操作 | 引导复杂工作流 |
| 返回值 | 立即结果 | 对话上下文 + 执行上下文变更 |
| 示例 | Read、Write、Bash |
internal-comms、skill-creator |
| 并发性 | 一般安全 | 并发不安全 |
| 类型 | 多种 | 始终为 "prompt" |
构建 Agent Skills
接下来以 Anthropic 技能仓库中的 skill-creator 为案例,深入看看如何构建 Skills。提醒一下:agent skills 是由指令、脚本、资源组织成的文件夹,agent 可以动态发现并加载,用来更好地完成特定任务。Skills 通过把你的专业知识打包成可组合资源,扩展 Claude 的能力,让通用 agent 变成更贴合需求的专用 agent。
关键结论:Skill = 提示模板 + 对话上下文注入 + 执行上下文修改 + 可选数据文件与 Python 脚本
每个 Skill 都定义在名为 SKILL.md(大小写不敏感)的 Markdown 文件中,可选的附带文件位于 /scripts、/references、/assets。这些附带文件可以是 Python 脚本、Shell 脚本、字体定义、模板等。以 skill-creator 为例,它包含 SKILL.md、用于许可证的 LICENSE.txt,以及 /scripts 目录下的若干 Python 脚本;它不包含 /references 或 /assets。
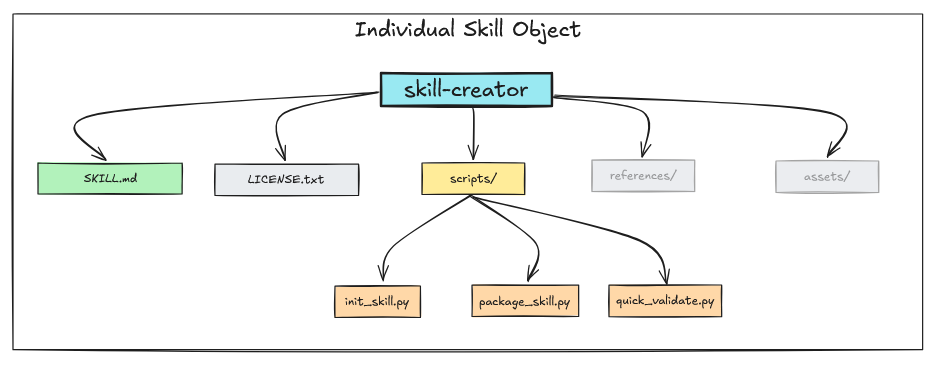
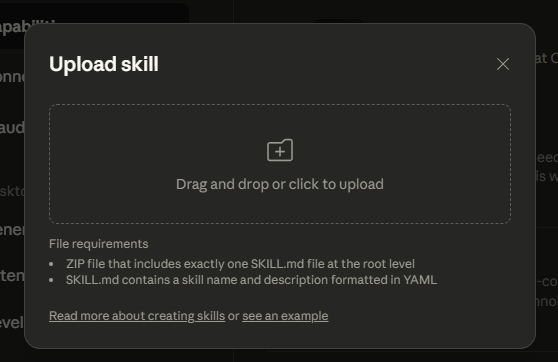
Skills 来自多个来源:Claude Code 会扫描用户设置(~/.config/claude/skills/)、项目设置(.claude/skills/)、插件提供的技能、内置技能,构建可用技能列表。对于 Claude Desktop,可以按如下方式上传自定义技能:
注意:构建 Skills 最重要的概念是渐进披露(Progressive Disclosure)——先提供足够信息让 agent 做决策,再按需揭示更多细节。对于 agent skills:
- 披露 Frontmatter:最小信息(name、description、license)
- 选择某个 skill 后,加载
SKILL.md:完整但聚焦- 执行 skill 时,再加载辅助 assets、references、scripts
编写 SKILL.md
SKILL.md 是 skill 提示词的核心。它遵循双段结构:frontmatter + 内容。frontmatter 配置如何运行(权限、模型、元数据),而正文则告诉 Claude 做什么。frontmatter 是 Markdown 文件开头的 YAML 区块。
1 | ┌─────────────────────────────────────┐ |
Frontmatter
frontmatter 包含控制 Claude 发现与使用 skill 的元数据。以下是 skill-creator 的 frontmatter 示例:
1 |
|
下面逐项解释 frontmatter 字段。

name(必填)
顾名思义:skill 的名称。skill 的 name 会作为 Skill 工具中的 command。
skill 的
name会作为 Skill 工具的command。
description(必填)
description 提供 skill 的简要概述,这是 Claude 判断何时调用技能的首要信号。在示例里,它明确写道“当用户想创建新 skill 时使用”——这种清晰、以动作驱动的描述能帮助 Claude 将用户意图与 skill 能力匹配起来。
系统会自动在描述中追加来源信息(例如 (plugin:skills)),这有助于在多来源技能同时加载时区分不同来源。
when_to_use(未文档化——可能已废弃或未来特性)
⚠️ 重要提示:
when_to_use字段在代码中大量出现,但未在任何官方 Anthropic 文档中记录。它可能是:
- 正在废弃的旧功能
- 仍未正式支持的内部/实验功能
- 尚未发布的计划特性
建议:依赖更详细的
description字段。官方文档出现之前,避免在生产技能中使用when_to_use。
尽管没文档,它在代码中的当前行为如下:
1 | function formatSkill(skill) { |
当 when_to_use 存在时,会以连字符追加到描述后,例如:
1 | "skill-creator": Create well-structured, reusable skills... - When user wants to build a custom skill package with scripts, references, or assets |
这条组合字符串就是 Claude 在 Skill 工具提示里看到的内容。但由于这一行为未被文档化,未来可能变更或移除。更安全的做法是把使用说明直接写入 description 字段(如上面 skill-creator 的示例)。
license(可选)
顾名思义。
allowed-tools(可选)
allowed-tools 定义该 skill 可以在无需用户批准情况下使用的工具,类似 Claude 的 allowed-tools。
它是一个以逗号分隔的字符串,会解析成工具名数组。可以用通配符限制权限范围,例如 Bash(git:*) 仅允许 git 子命令,而 Bash(npm:*) 允许所有 npm 操作。skill-creator 使用 "Read,Write,Bash,Glob,Grep,Edit" 以获得广泛的文件与搜索能力。常见误区是列出所有工具,这会引入安全风险并破坏安全模型。
只列出实际需要的工具——如果只是读写文件,
"Read,Write"就足够。
1 |
|
model(可选)
model 定义 skill 可使用的模型。默认继承当前会话模型。对于复杂任务(如代码审查),skill 可以请求更强的模型,例如 Claude Opus 或其他 OSS 中文模型(懂的都懂)。
1 | model: "claude-opus-4-20250514" |
version、disable-model-invocation 与 mode(可选)
Skills 支持三个可选 frontmatter 字段用于版本与调用控制。version(例如 version: "1.0.0")是用于记录 skill 版本的元数据,解析后主要用于文档与管理。
disable-model-invocation(布尔值)会阻止 Claude 通过 Skill 工具自动调用该 skill。设置为 true 时,技能不会出现在 Claude 可见列表中,只能由用户通过 /skill-name 手动调用,适合危险操作、配置命令或需要明确用户控制的交互流程。
mode(布尔值)会把 skill 标记为“模式命令”,即修改 Claude 行为或上下文的技能。设为 true 时,这类 skill 会在技能列表顶部的 “Mode Commands” 区域单独显示,例如 debug-mode、expert-mode、review-mode 等,方便建立特定操作上下文或工作流。
SKILL.md 提示内容
frontmatter 之后是 Markdown 正文——这才是 skill 被调用时 Claude 收到的实际提示。这里定义技能的行为、指令与工作流。写好 skill 提示的关键是保持聚焦并使用渐进披露:核心指令放在 SKILL.md,详细内容引用外部文件。
推荐的内容结构如下:
1 |
|
例如 skill-creator 的 SKILL.md 里包含如下步骤:
1 | ## Skill Creation Process |
当 Claude 调用该 skill 时,它会接收到完整提示,并在前面加上基础目录路径。{baseDir} 会解析为 skill 的安装目录,因此 Claude 可以用 Read 工具读取参考文件:Read({baseDir}/scripts/init_skill.py)。这种模式让主提示保持简洁,而详细文档可按需加载。
提示内容最佳实践:
- 控制在 5,000 字(约 800 行)以内,避免上下文过载
- 使用祈使句(“Analyze code for …”),而不是第二人称(“You should analyze …”)
- 详细内容放外部文件,不要把全部内容塞进主提示
- 路径用
{baseDir},不要硬编码绝对路径如/home/user/project/
1 | ❌ Read /home/user/project/config.json |
当技能被调用时,Claude 只会获得 allowed-tools 中指定的工具权限;frontmatter 若指定 model,也可能覆盖当前模型。同时系统会自动提供 skill 的基础目录路径,以访问打包资源。
为技能打包资源
当你在 SKILL.md 之外打包辅助资源时,技能会变得更强大。标准结构包含三个目录:
1 | my-skill/ |
为什么要打包资源?保持 SKILL.md 简洁(少于 5,000 字)可以避免 Claude 的上下文窗口被淹没。打包资源能让你提供详细文档、自动化脚本与模板,而不会撑大主提示。Claude 只在需要时通过渐进披露加载这些资源。
scripts/ 目录
scripts/ 目录包含 Claude 通过 Bash 工具执行的代码——自动化脚本、数据处理器、校验器或代码生成器等确定性操作。
例如 skill-creator 的 SKILL.md 会这样引用脚本:
1 | 从头开始创建新 skill 时,始终运行 `init_skill.py` 脚本。该脚本方便地生成新的模板 skill 目录,自动包含 skill 所需的一切,使 skill 创建过程更加高效和可靠。 |
该脚本:
- 在指定路径创建 skill 目录
- 生成带有正确 frontmatter 和 TODO 占位符的 SKILL.md 模板
- 创建示例资源目录:scripts/、references/ 和 assets/
- 在每个目录中添加可自定义或删除的示例文件
1
2
3
4
5
6
7
8
9
10
Claude 看到这个指令后,会执行 `python {baseDir}/scripts/init_skill.py`。`{baseDir}` 自动解析为 skill 安装路径,使技能可在不同环境下移植。
对于复杂多步骤操作、数据转换、API 交互或逻辑更适合代码表达的任务,用 `scripts/` 最合适。
#### `references/` 目录
`references/` 存放 Claude 会读取进上下文的文档(文本内容):Markdown、JSON schema、配置模板或任务所需的说明文档。
例如 `mcp-creator` 的 `SKILL.md` 会这样引用 references:
1.4 Study Framework Documentation
加载并读取以下参考文件:
- MCP 最佳实践:📋 查看最佳实践 - 所有 MCP 服务器的核心指南
对于 Python 实现,还要加载:
- Python SDK 文档:使用 WebFetch 加载
https://raw.githubusercontent.com/modelcontextprotocol/python-sdk/main/README.md - 🐍 Python 实现指南 - Python 特定的最佳实践和示例
对于 Node/TypeScript 实现,还要加载:
- TypeScript SDK 文档:使用 WebFetch 加载
https://raw.githubusercontent.com/modelcontextprotocol/typescript-sdk/main/README.md - ⚡ TypeScript 实现指南 - Node/TypeScript 特定的最佳实践和示例
1
2
3
4
5
6
7
8
9
10
当 Claude 遇到这些指令时,会使用 Read 工具:`Read({baseDir}/references/mcp_best_practices.md)`。内容会被加载到上下文,而不污染 `SKILL.md`。
`references/` 适用于详细文档、大型模式库、检查清单、API schema 等过于冗长但任务需要的文本内容。
#### `assets/` 目录
`assets/` 目录包含模板与二进制文件,Claude 只通过路径引用它们,不会把内容读入上下文。它们是技能的静态资源——HTML 模板、CSS 文件、图片、配置样板或字体等。
在 `SKILL.md` 中:
使用 {baseDir}/assets/report-template.html 处的模板作为报告结构。
引用 {baseDir}/assets/diagram.png 处的架构图。1
2
3
4
5
6
7
8
9
10
11
12
13
14
15
16
17
18
19
20
21
22
23
24
25
26
27
Claude 看到的是路径,但不会读取内容。它可能会复制模板到新位置、填充占位符或在输出中引用路径。
`assets/` 适用于 HTML/CSS 模板、图片、二进制文件、配置模板等仅通过路径操作而非读入上下文的文件。
`references/` 与 `assets/` 的关键区别是:
- `references/`:文本内容通过 Read 工具读入 Claude 上下文
- `assets/`:文件仅以路径引用,不读入上下文
这个区别很重要:`references/` 中的 10KB Markdown 会占用上下文 token;`assets/` 中的 10KB HTML 模板不会。Claude 只知道该路径存在。
> 最佳实践:路径永远使用 `{baseDir}`,不要硬编码绝对路径。这能让 skills 在不同用户环境、项目目录与安装路径中保持可移植性。
### 常见 Skill 模式
在工程实践中,理解通用模式有助于设计更有效的 skills。以下是工具集成与工作流设计的常见模式。
#### 模式 1:脚本自动化(Script Automation)
**适用场景**:需要多个命令或确定性逻辑的复杂操作。
该模式把计算任务交给 `scripts/` 中的 Python/Bash 脚本。skill 提示告诉 Claude 运行脚本并处理输出。

`SKILL.md` 示例:
Run scripts/analyzer.py on the target directory:
python {baseDir}/scripts/analyzer.py --path "$USER_PATH" --output report.json
Parse the generated report.json and present findings.1
2
所需工具:
allowed-tools: “Bash(python {baseDir}/scripts/:), Read, Write”1
2
3
4
5
6
7
8
9
10
#### 模式 2:读 - 处理 - 写(Read - Process - Write)
**适用场景**:文件转换与数据处理。
这是最简单的模式:读取输入,按指令转换,写出结果。适用于格式转换、数据清洗或报告生成。
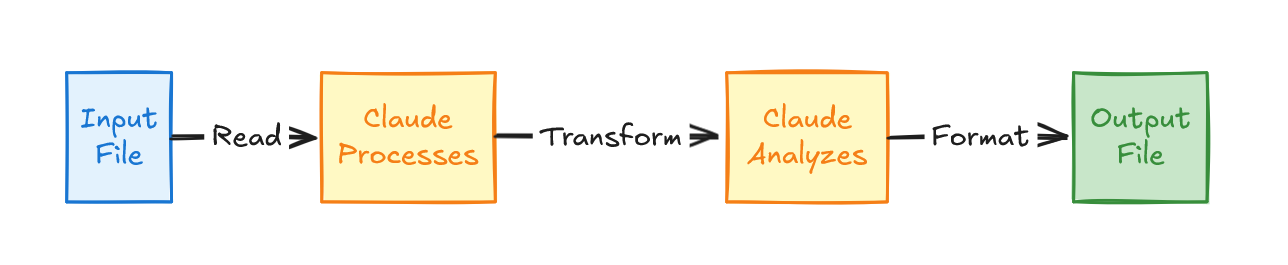
`SKILL.md` 示例:
Processing Workflow
- Read input file using Read tool
- Parse content according to format
- Transform data following specifications
- Write output using Write tool
- Report completion with summary
1
2
所需工具:
allowed-tools: “Read, Write”1
2
3
4
5
6
7
8
9
10
#### 模式 3:搜索 - 分析 - 报告(Search - Analyze - Report)
**适用场景**:代码库分析与模式检测。
使用 Grep 搜索代码库中的模式,读取匹配文件上下文,进行分析并生成结构化报告。也可用于检索企业数据并分析输出报告。
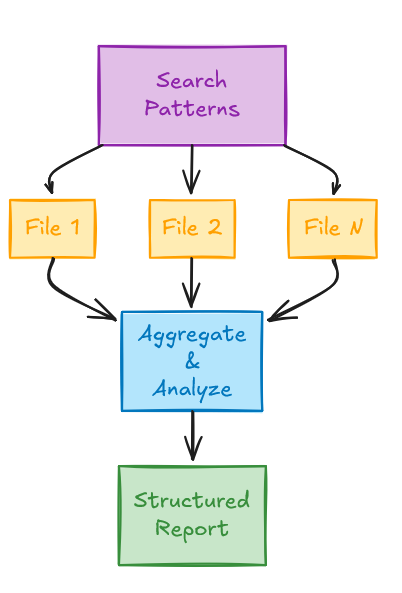
`SKILL.md` 示例:
Analysis Process
- Use Grep to find relevant code patterns
- Read each matched file
- Analyze for vulnerabilities
- Generate structured report
1
2
所需工具:
allowed-tools: “Grep, Read”1
2
3
4
5
6
7
8
9
10
#### 模式 4:命令链执行(Command Chain Execution)
**适用场景**:有依赖关系的多步骤操作。
按顺序执行命令,每步依赖前一步成功,常用于 CI/CD 风格的流程。
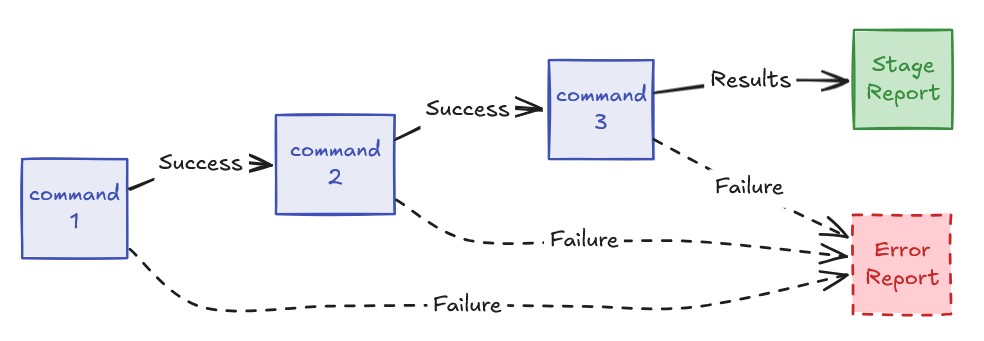
`SKILL.md` 示例:
Execute analysis pipeline:
npm install && npm run lint && npm test
Report results from each stage.1
2
所需工具:
allowed-tools: “Bash(npm install:), Bash(npm run:), Read”1
2
3
4
5
6
7
8
9
10
### 高级模式(Advanced Patterns)
#### 向导式多步骤流程(Wizard-Style Multi-Step Workflows)
**适用场景**:需要在每一步都获取用户输入的复杂流程。
把复杂任务拆分为离散步骤,每一步都需要用户确认后继续。适合安装向导、配置工具或引导式流程。
`SKILL.md` 示例:
Workflow
Step 1: Initial Setup
- Ask user for project type
- Validate prerequisites exist
- Create base configuration
Wait for user confirmation before proceeding.
Step 2: Configuration
- Present configuration options
- Ask user to choose settings
- Generate config file
Wait for user confirmation before proceeding.
Step 3: Initialization
- Run initialization scripts
- Verify setup successful
- Report results
1
2
3
4
5
6
7
8
#### 模板驱动生成(Template-Based Generation)
**适用场景**:从 `assets/` 中的模板生成结构化输出。
加载模板,填充用户提供或生成的数据,然后写出结果。常用于报告生成、样板代码或文档。
`SKILL.md` 示例:
Generation Process
- Read template from {baseDir}/assets/template.html
- Parse user requirements
- Fill template placeholders:
- → user-provided name
- → generated summary
- → current date
- Write filled template to output file
- Report completion
1
2
3
4
5
6
7
8
#### 迭代精化(Iterative Refinement)
**适用场景**:需要多轮、逐步深入的流程。
先做广泛分析,再对发现的问题进行更深入的检查。适用于代码评审、安全审计或质量分析。
`SKILL.md` 示例:
Iterative Analysis
Pass 1: Broad Scan
- Search entire codebase for patterns
- Identify high-level issues
- Categorize findings
Pass 2: Deep Analysis
For each high-level issue:
- Read full file context
- Analyze root cause
- Determine severity
Pass 3: Recommendation
For each finding:
- Research best practices
- Generate specific fix
- Estimate effort
Present final report with all findings and recommendations.1
2
3
4
5
6
7
8
#### 上下文聚合(Context Aggregation)
**适用场景**:从多来源汇总信息以形成完整理解。
从不同文件与工具收集数据,综合成连贯结论。适合项目总结、依赖分析或影响评估。
`SKILL.md` 示例:
Context Gathering
- Read project README.md for overview
- Analyze package.json for dependencies
- Grep codebase for specific patterns
- Check git history for recent changes
- Synthesize findings into coherent summary
1
2
3
4
5
6
7
8
9
10
11
12
13
14
15
16
17
18
19
20
21
22
23
24
25
26
# Agent Skills 内部架构
有了概览与构建流程后,我们再深入技能系统的内部。Skill 系统是一个元工具架构:名为 Skill 的工具充当容器与调度器,管理所有具体技能。这个设计在实现与目的上都与传统工具截然不同。
> Skill 工具是管理所有技能的元工具。
## Skills 对象设计
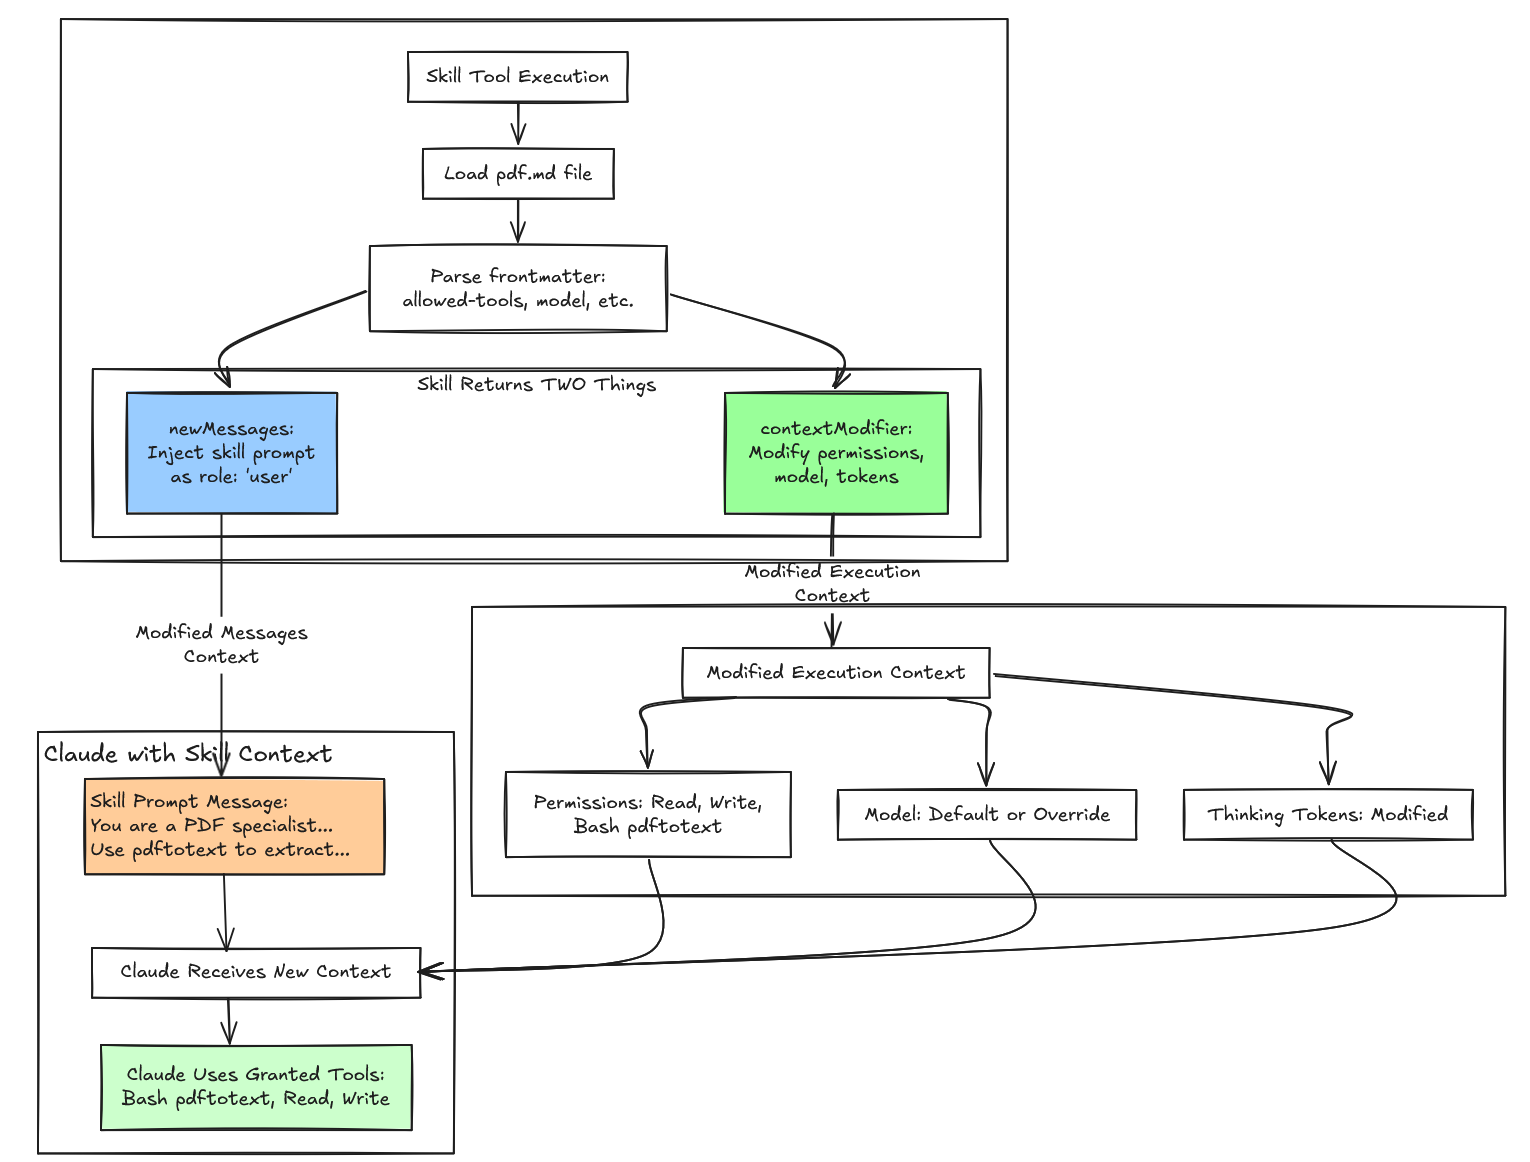
传统工具(Read、Bash、Write)执行离散动作并返回即时结果;skills 则不同。它们不直接执行动作,而是**向对话历史注入专门指令**,并动态修改 Claude 的执行环境。具体做法是:注入两条 user message(一条可见的元数据消息,另一条隐藏但发送给 Claude 的完整技能提示),同时调整 agent 的上下文(修改权限、切换模型、调整思考 token 参数),作用范围仅限技能执行期间。
| 特性 | 普通工具 | Skill 工具 |
| --- | --- | --- |
| 本质 | 直接执行动作 | 提示词注入 + 上下文修改 |
| 消息角色 | assistant → tool_use;user → tool_result | assistant → tool_use Skill;user → tool_result;user → skill prompt(注入) |
| 复杂度 | 简单(3-4 条消息) | 复杂(5-10+ 条消息) |
| 上下文 | 静态 | 动态(每轮修改) |
| 持久性 | 仅工具交互 | 工具交互 + skill prompts |
| token 开销 | 低(~100 tokens) | 高(~1,500+ tokens/轮) |
| 使用场景 | 简单直接任务 | 复杂引导工作流 |
复杂度显著提升:普通工具只产生“assistant 工具调用 + user 返回结果”的简单交互;skills 会注入多条消息,在动态上下文中运行,并带来可观 token 开销,以提供引导 Claude 行为的专用指令。
理解 Skill 元工具的运作机制尤为关键。其结构如下:
Pd = {
name: “Skill”, // The tool name constant: $N = “Skill”
inputSchema: {
command: string // E.g., “pdf”, “skill-creator”
},
outputSchema: {
success: boolean,
commandName: string
},
// 🔑 KEY FIELD: This generates the skills list
prompt: async () => fN2(),
// Validation and execution
validateInput: async (input, context) => { / 5 error codes / },
checkPermissions: async (input, context) => { / allow/deny/ask / },
call: async (input, context) => { / yields messages + context modifier */ }
}1
2
`prompt` 字段让 Skill 工具区别于 Read/Bash 之类的普通工具。普通工具的描述是固定字符串,而 Skill 工具会在运行时**动态生成描述**,把所有可用技能的 name 与 description 汇总起来。这就是渐进披露:系统只把最小元数据(skills 名称与描述)放入 Claude 初始上下文,让模型决定匹配的技能;完整 skill prompt 只有在选择后才加载,既保证可发现性,又避免上下文膨胀。
async function fN2() {
let A = await atA(),
{
modeCommands: B,
limitedRegularCommands: Q
} = vN2(A),
G = […B, …Q].map((W) => W.userFacingName()).join(“, “);
l(Skills and commands included in Skill tool: ${G});
let Z = A.length - B.length,
Y = nS6(B),
J = aS6(Q, Z);
return `在主对话中执行技能
当用户要求执行任务时,检查下面可用的技能是否可以更有效地完成任务。技能提供专门的能力和领域知识。
如何使用技能:
- 使用此工具仅通过技能名称调用技能(无参数)
- 调用技能时,您会看到
- 技能提示将展开并提供完成任务的详细说明
- 示例:
- `command: “pdf”` - 调用 pdf 技能
- `command: “xlsx”` - 调用 xlsx 技能
- `command: “ms-office-suite:pdf”` - 使用完全限定名称调用
重要:
- 仅使用下面 <available_skills> 中列出的技能
- 不要调用已运行的技能
- 不要将此工具用于内置 CLI 命令(如 /help、/clear 等)
</skills_instructions>
<available_skills>
${Y}${J}
</available_skills>
`;
}1
2
不同于某些工具(如 ChatGPT)把工具列表写在系统提示词中,Claude 的 agent skills 并不在 system prompt 里,而是在 tools 数组中,以 Skill 工具描述的一部分呈现。每个 skill 名称对应 Skill 元工具输入 schema 的 `command` 字段。为了更直观地理解,以下是 API 请求结构:
{
“model”: “claude-sonnet-4-5-20250929”,
“system”: “You are Claude Code, Anthropic’s official CLI…”, // ← System prompt
“messages”: [
{“role”: “user”, “content”: “Help me create a new skill”},
// … conversation history
],
“tools”: [ // ← Tools array sent to Claude
{
“name”: “Skill”, // ← The meta-tool
“description”: “Execute a skill…\n\n<skills_instructions>…\n\n<available_skills>\n…”,
“input_schema”: {
“type”: “object”,
“properties”: {
“command”: {
“type”: “string”,
“description”: “The skill name (no arguments)” // ← Name of individual skill
}
}
}
},
{
“name”: “Bash”,
“description”: “Execute bash commands…”,
// …
},
{
“name”: “Read”,
// …
}
// … other tools
]
}1
2
3
4
5
6
7
8
9
10
11
12
13
14
15
16
17
18
`<available_skills>` 位于 Skill 工具描述中,每次 API 请求都会重生成。系统会汇总当前已加载的技能(用户/项目配置、插件技能、内置技能),并受默认 15,000 字符的 token 预算限制。这迫使作者写出简洁的技能描述,也确保工具描述不会淹没模型上下文。
## Skill 的对话与执行上下文注入设计
多数 LLM API 支持 `role: "system"` 消息,可承载系统提示词。实际上,OpenAI 的 ChatGPT 会把默认工具写在系统提示词里,包括 bio(记忆)、automations(任务调度)、canmore(控制 canvas)、img_gen(图像生成)、file_search、python、web(联网搜索)等。而且工具提示占据系统提示词约 90% 的 token。对于有大量工具或技能的场景,这种方式并不高效。
但 system message 的语义不同,导致它不适合作为技能载体:system message 设置的是**全局上下文**,在整个对话中持续生效,权限高于用户指令。
Skills 需要临时、范围限定的行为。`skill-creator` 只应影响技能创建任务,而不该把 Claude 永久变成 PDF 专家。使用 `role: "user"` 且 `isMeta: true` 的方式,使 skill prompt 以“用户输入”的形式注入 Claude,从而保持临时性与局部性;技能完成后,对话上下文与执行上下文会回归正常,不留下残留影响。
普通工具如 Read/Write/Bash 通信模式简单:Claude 调用 Read,发送文件路径,拿到文件内容即可。用户在聊天记录中看到“Claude 使用了 Read 工具”,这就够了。但 skills 不是执行离散动作,而是注入完整指令集,改变 Claude 处理任务的方式。因此出现新的设计挑战:用户需要知道正在运行哪个 skill 以及它在做什么,而 Claude 需要详细(可能很长)的指令。如果用户看到完整 skill prompt,UI 会被成千上万字的内部指令淹没;如果完全隐藏 skill 激活,用户又会失去可见性。解决方案是分离两个沟通通道:不同可见性规则的消息。
Skills 系统通过 `isMeta` 标记控制消息是否出现在 UI 中:`isMeta: false`(或省略时默认 false)会显示在用户对话记录;`isMeta: true` 会发送给 API 但不显示在 UI。这个简单的布尔标记实现了双通道通信:一条给人类,一条给 AI。
当 skill 执行时,系统会注入两条 user message:第一条携带元数据(`isMeta: false`,对用户可见,作为状态指示);第二条携带完整 skill prompt(`isMeta: true`,对 UI 隐藏,但 Claude 可见)。这样在不淹没用户的前提下,仍然保证透明度。
元数据消息使用简洁 XML 结构,前端可解析并展示:
let metadata = [
<command-message>${statusMessage}</command-message>,
<command-name>${skillName}</command-name>,
args ? <command-args>${args}</command-args> : null
].filter(Boolean).join(‘\n’);
// Message 1: NO isMeta flag → defaults to false → VISIBLE
messages.push({
content: metadata,
autocheckpoint: checkpointFlag
});1
2
例如 PDF 技能激活时,用户会看到:
1
2
3
4
这条消息刻意保持简短(约 50-200 字符)。XML 标签让前端可用特殊样式渲染、校验 `<command-message>` 标签存在,并为会话中的技能执行维护审计轨迹。由于 `isMeta` 默认 false,这条元数据会自动出现在 UI。
skill prompt 消息则相反:它加载 `SKILL.md` 的完整内容,可能附加上下文,显式设置 `isMeta: true`:
let skillPrompt = await skill.getPromptForCommand(args, context);
// Augment with prepend/append content if needed
let fullPrompt = prependContent.length > 0 || appendContent.length > 0
? […prependContent, …appendContent, …skillPrompt]
: skillPrompt;
// Message 2: Explicit isMeta: true → HIDDEN
messages.push({
content: fullPrompt,
isMeta: true // HIDDEN FROM UI, SENT TO API
});1
2
典型 skill prompt 长度 500-5,000 词,为改变 Claude 行为提供完整指导。例如 PDF skill prompt 可能是:
您是 PDF 处理专家。
您的任务是使用 pdftotext 工具从 PDF 文档中提取文本。
流程
- 验证 PDF 文件是否存在
- 运行 pdftotext 命令提取文本
- 读取输出文件
- 向用户呈现提取的文本
可用工具
您可以访问:
- Bash(pdftotext:*) - 用于运行 pdftotext 命令
- Read - 用于读取提取的文本
- Write - 用于在需要时保存结果
输出格式
以清晰格式呈现提取的文本。
基础目录:/path/to/skill
用户参数:report.pdf1
2
3
4
这个提示建立任务上下文、列出工作流、指定可用工具、定义输出格式,并提供环境路径。通过标题、列表、代码块的 Markdown 结构,Claude 更容易解析并遵循指令。`isMeta: true` 让完整提示发送给 API,却不会污染用户对话记录。
除了元数据与 skill prompt 之外,skill 还可注入附加消息(附件、权限等):
let allMessages = [
createMessage({ content: metadata, autocheckpoint: flag }), // 1. Metadata
createMessage({ content: skillPrompt, isMeta: true }), // 2. Skill prompt
…attachmentMessages, // 3. Attachments (conditional)
…(allowedTools.length || skill.model ? [
createPermissionsMessage({ // 4. Permissions (conditional)
type: “command_permissions”,
allowedTools: allowedTools,
model: skill.useSmallFastModel ? getFastModel() : skill.model
})
] : [])
];1
2
3
4
5
6
附件消息可以携带诊断信息、文件引用或补充上下文。权限消息只有在 frontmatter 指定 `allowed-tools` 或请求模型覆盖时才出现,提供修改运行时环境的元数据。模块化组合让每条消息都有清晰职责,基于 skill 配置可选拼装,在保持 `isMeta` 可见性控制的同时扩展两消息模式以适配更复杂场景。
### 为什么要两条消息,而不是一条?
如果只用一条消息,就必须在可见性上做不可能的取舍:设置 `isMeta: false` 会把整条消息显示出来,数千字的 AI 指令会淹没聊天记录;用户会看到:
┌─────────────────────────────────────────────┐
│ The “pdf” skill is loading │
│ │
│ You are a PDF processing specialist. │
│ │
│ Your task is to extract text from PDF │
│ documents using the pdftotext tool. │
│ │
│ ## Process │
│ │
│ 1. Validate the PDF file exists │
│ 2. Run pdftotext command to extract text │
│ 3. Read the output file │
│ … [500 more lines] … │
└─────────────────────────────────────────────┘1
2
3
4
5
6
7
8
9
10
11
12
13
14
15
16
17
18
19
20
21
22
23
24
25
26
27
UI 会变得不可用,因为内部实现细节充斥其中。如果设置 `isMeta: true`,则所有内容都被隐藏,用户看不到哪个技能被激活、传入了什么参数。系统对用户完全不透明。
两条消息的分拆正好解决这个矛盾:第一条 `isMeta: false` 提供用户透明度;第二条 `isMeta: true` 为 Claude 提供详细指令。精细化控制让透明度与清晰度兼得。
两类消息服务的对象与目的也不同:
| 维度 | 元数据消息 | Skill Prompt 消息 |
| --- | --- | --- |
| 受众 | 人类用户 | Claude(AI) |
| 目的 | 状态/透明度 | 指令/引导 |
| 长度 | ~50-200 字符 | ~500-5,000 词 |
| 格式 | 结构化 XML | 自然语言 Markdown |
| 可见性 | 应可见 | 应隐藏 |
| 内容 | “发生了什么?” | “如何完成?” |
代码库对这两类消息走不同处理路径:元数据消息会解析 `<command-message>` 标签、校验并格式化后展示;skill prompt 直接发给 API,不解析不校验——它是纯粹的指令内容。把两者合并会违反单一职责原则,让一条消息承担两种受众与两种处理流程。
## 案例:执行生命周期
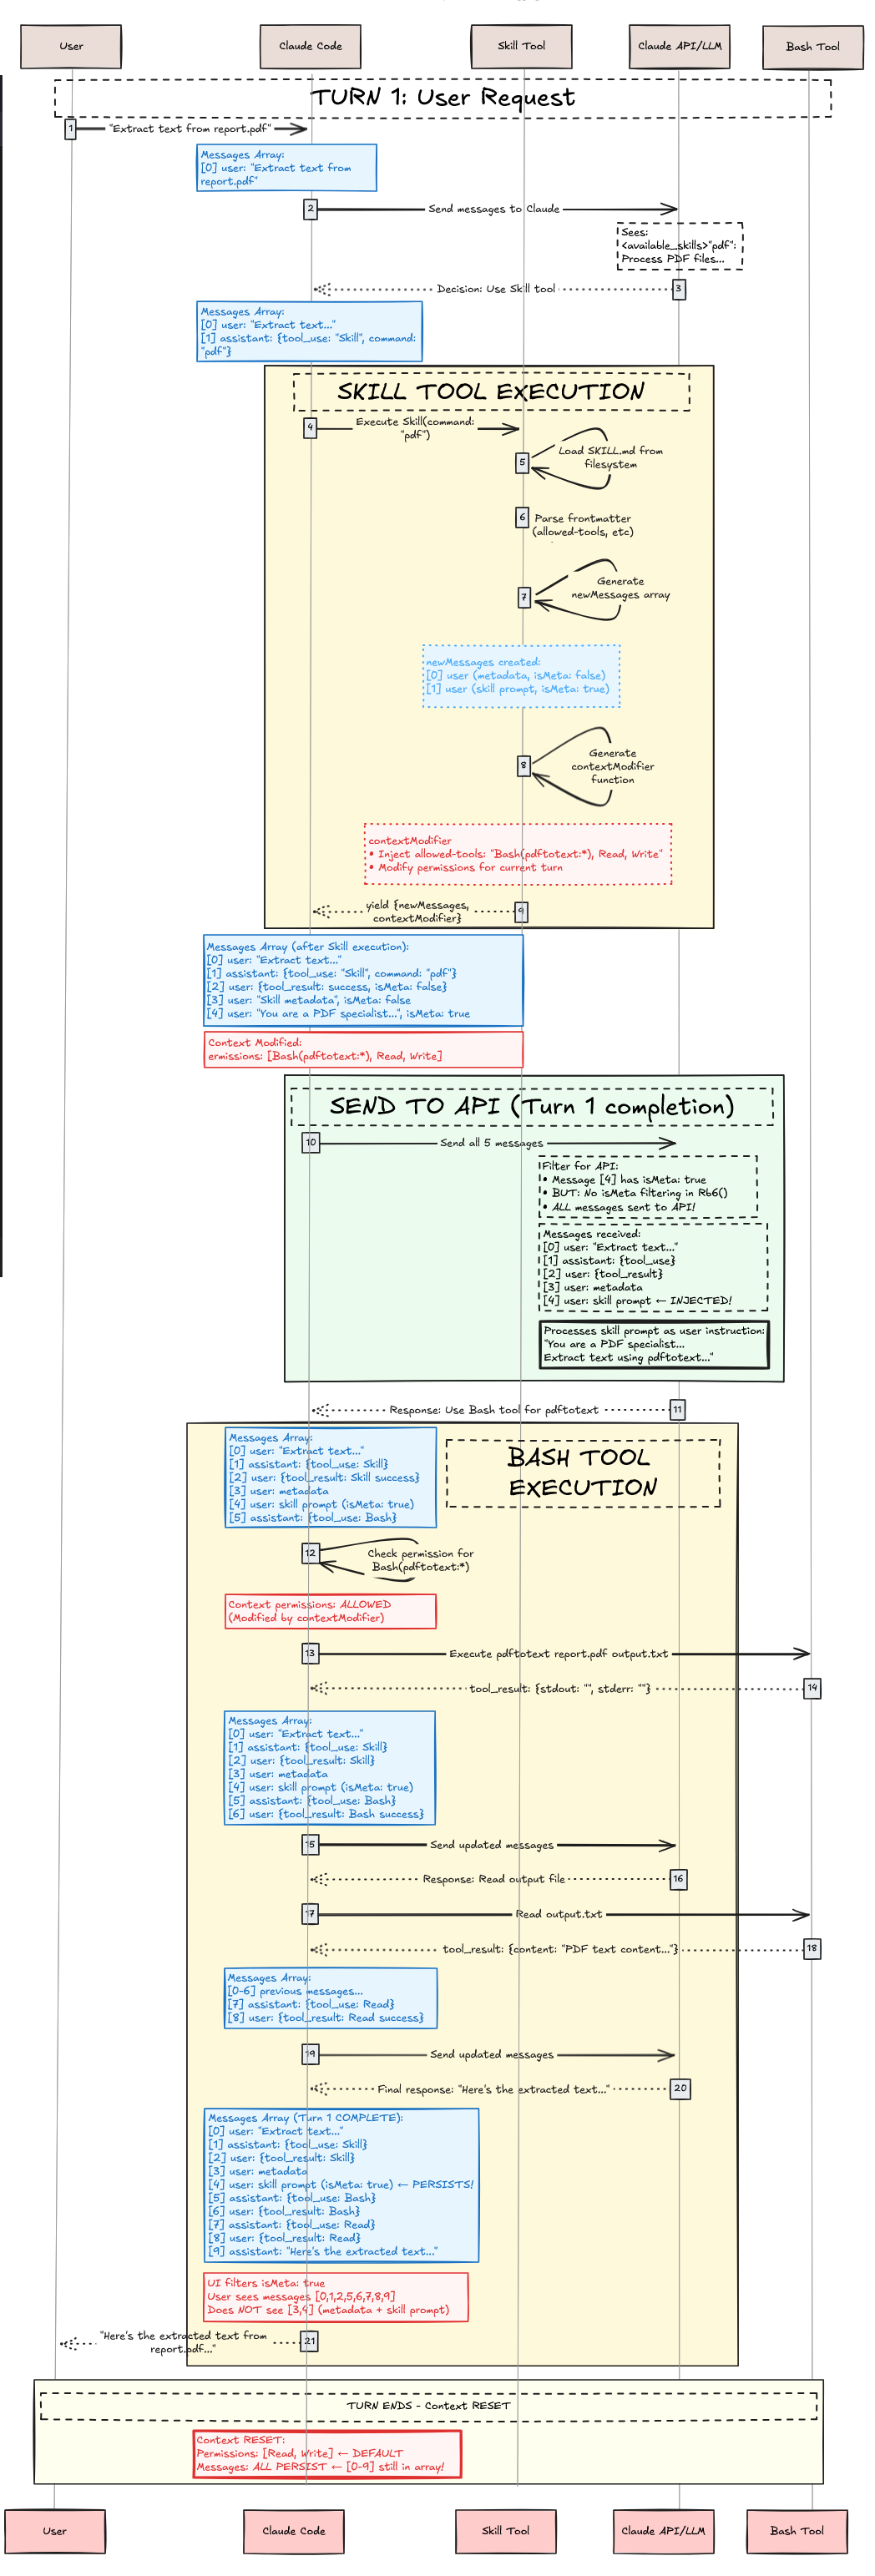
在理解 Agent Skills 内部架构后,我们以“Extract text from report.pdf”这个请求为例,完整走一遍假设的 pdf skill 执行流程。
### Phase 1:发现与加载(启动)
Claude Code 启动时会扫描 skills:
async function getAllCommands() {
// Load from all sources in parallel
let [userCommands, skillsAndPlugins, pluginCommands, builtins] =
await Promise.all([
loadUserCommands(), // ~/.claude/commands/
loadSkills(), // .claude/skills/ + plugins
loadPluginCommands(), // Plugin-defined commands
getBuiltinCommands() // Hardcoded commands
]);
return […userCommands, …skillsAndPlugins, …pluginCommands, …builtins]
.filter(cmd => cmd.isEnabled());
}
// Specific skill loading
async function loadPluginSkills(plugin) {
// Check if plugin has skills
if (!plugin.skillsPath) return [];
// Two patterns supported:
// 1. Root SKILL.md in skillsPath
// 2. Subdirectories with SKILL.md
const skillFiles = findSkillMdFiles(plugin.skillsPath);
const skills = [];
for (const file of skillFiles) {
const content = readFile(file);
const { frontmatter, markdown } = parseFrontmatter(content);
skills.push({
type: "prompt",
name: `${plugin.name}:${getSkillName(file)}`,
description: `${frontmatter.description} (plugin:${plugin.name})`,
whenToUse: frontmatter.when_to_use, // ← Note: underscores!
allowedTools: parseTools(frontmatter['allowed-tools']),
model: frontmatter.model === "inherit" ? undefined : frontmatter.model,
isSkill: true,
promptContent: markdown,
// ... other fields
});
}
return skills;
}1
2
对于 pdf skill,最终会生成:
{
type: “prompt”,
name: “pdf”,
description: “Extract text from PDF documents (plugin:document-tools)”,
whenToUse: “When user wants to extract or process text from PDF files”,
allowedTools: [“Bash(pdftotext:*)”, “Read”, “Write”],
model: undefined, // Uses session model
isSkill: true,
disableModelInvocation: false,
promptContent: “You are a PDF processing specialist…”,
// … other fields
}1
2
3
4
5
6
7
8
### Phase 2:第 1 轮用户请求与技能选择
用户请求:“Extract text from report.pdf”。Claude 收到消息以及 tools 数组中的 Skill 工具。在 Claude 决定调用 pdf skill 前,系统必须在 Skill 工具描述中列出可用技能。
#### 技能过滤与呈现
并非所有技能都显示在 Skill 工具中。一个技能必须在 frontmatter 中包含 `description` 或 `when_to_use`,否则会被过滤。过滤条件如下:
async function getSkillsForSkillTool() {
const allCommands = await getAllCommands();
return allCommands.filter(cmd =>
cmd.type === “prompt” &&
cmd.isSkill === true &&
!cmd.disableModelInvocation &&
(cmd.source !== “builtin” || cmd.isModeCommand === true) &&
(cmd.hasUserSpecifiedDescription || cmd.whenToUse) // ← Must have one!
);
}1
2
3
4
#### 技能格式化
每个技能都会被格式化进 `<available_skills>`。例如 pdf skill 可能呈现为:
“pdf”: Extract text from PDF documents - When user wants to extract or process text from PDF files1
2
对应格式函数:
function formatSkill(skill) {
let name = skill.name;
let description = skill.whenToUse
? ${skill.description} - ${skill.whenToUse}
: skill.description;
return "${name}": ${description};
}1
2
3
4
#### Claude 的决策过程
当用户提示“Extract text from report.pdf”时,Claude 会在 API 请求里看到 Skill 工具与 `<available_skills>`,然后进行推理(这里是合理的假设,因为我们看不到真实推理轨迹):
Internal reasoning:
- User wants to “extract text from report.pdf”
- This is a PDF processing task
- Looking at available skills…
- “pdf”: Extract text from PDF documents - When user wants to extract or process text from PDF files
- This matches! The user wants to extract text from a PDF
- Decision: Invoke Skill tool with command=”pdf”
1
2
注意:这里没有任何算法匹配,没有词法匹配、语义匹配或搜索。完全是 LLM 的推理决策。完成后,Claude 会返回工具调用:
{
“type”: “tool_use”,
“id”: “toolu_123abc”,
“name”: “Skill”,
“input”: {
“command”: “pdf”
}
}1
2
3
4
5
6
### Phase 3:Skill 工具执行
Skill 工具开始执行,对应时序图中黄色的 “SKILL TOOL EXECUTION” 盒子,包含验证、权限检查、文件加载、上下文修改等步骤。
#### Step 1:验证
async validateInput({ command }, context) {
let skillName = command.trim().replace(/^\//, “”);
// Error 1: Empty
if (!skillName) return { result: false, errorCode: 1 };
// Error 2: Unknown skill
const allSkills = await getAllCommands();
if (!skillExists(skillName, allSkills)) {
return { result: false, errorCode: 2 };
}
// Error 3: Can’t load
const skill = getSkill(skillName, allSkills);
if (!skill) return { result: false, errorCode: 3 };
// Error 4: Model invocation disabled
if (skill.disableModelInvocation) {
return { result: false, errorCode: 4 };
}
// Error 5: Not prompt-based
if (skill.type !== “prompt”) {
return { result: false, errorCode: 5 };
}
return { result: true };
}1
2
3
4
pdf skill 通过全部校验 ✓
#### Step 2:权限检查
async checkPermissions({ command }, context) {
const skillName = command.trim().replace(/^\//, “”);
const permContext = (await context.getAppState()).toolPermissionContext;
// Check deny rules
for (const [pattern, rule] of getDenyRules(permContext)) {
if (matches(skillName, pattern)) {
return { behavior: “deny”, message: “Blocked by permission rules” };
}
}
// Check allow rules
for (const [pattern, rule] of getAllowRules(permContext)) {
if (matches(skillName, pattern)) {
return { behavior: “allow” };
}
}
// Default: ask user
return { behavior: “ask”, message: Execute skill: ${skillName} };
}1
2
3
4
5
6
若无规则限制,用户会看到提示:“Execute skill: pdf?”,用户批准 ✓
#### Step 3:加载 Skill 文件并生成执行上下文修改
完成验证与权限审批后,Skill 工具加载 skill 文件并准备执行上下文修改:
async *call({ command }, context) {
const skillName = command.trim().replace(/^\//, “”);
const allSkills = await getAllCommands();
const skill = getSkill(skillName, allSkills);
// Load the skill prompt
const promptContent = await skill.getPromptForCommand(“”, context);
// Generate metadata tags
const metadata = [
<command-message>The "${skill.userFacingName()}" skill is loading</command-message>,
<command-name>${skill.userFacingName()}</command-name>
].join(‘\n’);
// Create messages
const messages = [
{ type: “user”, content: metadata }, // Visible to user
{ type: “user”, content: promptContent, isMeta: true }, // Hidden from user, visible to Claude
// … attachments, permissions
];
// Extract configuration
const allowedTools = skill.allowedTools || [];
const modelOverride = skill.model;
// Yield result with execution context modifier
yield {
type: “result”,
data: { success: true, commandName: skillName },
newMessages: messages,
// 🔑 Execution context modification function
contextModifier(context) {
let modified = context;
// Inject allowed tools
if (allowedTools.length > 0) {
modified = {
...modified,
async getAppState() {
const state = await context.getAppState();
return {
...state,
toolPermissionContext: {
...state.toolPermissionContext,
alwaysAllowRules: {
...state.toolPermissionContext.alwaysAllowRules,
command: [
...state.toolPermissionContext.alwaysAllowRules.command || [],
...allowedTools // ← Pre-approve these tools
]
}
}
};
}
};
}
// Override model
if (modelOverride) {
modified = {
...modified,
options: {
...modified.options,
mainLoopModel: modelOverride
}
};
}
return modified;
}
};
}1
2
3
4
5
6
Skill 工具返回结果,包含 `newMessages`(元数据 + skill prompt + 权限消息,用于对话上下文注入)和 `contextModifier`(工具权限 + 模型覆盖,用于执行上下文修改)。这对应时序图中黄色的 “SKILL TOOL EXECUTION” 盒子。
### Phase 4:发送到 API(第 1 轮完成)
系统组装完整消息数组发送给 Anthropic API:包括对话历史 + 新注入的 skill 消息。
// Complete message array sent to API for Turn 1
{
model: “claude-sonnet-4-5-20250929”,
messages: [
{
role: “user”,
content: “Extract text from report.pdf”
},
{
role: “assistant”,
content: [
{
type: “tool_use”,
id: “toolu_123abc”,
name: “Skill”,
input: { command: “pdf” }
}
]
},
{
role: “user”,
content: “
// isMeta: false (default) - VISIBLE to user in UI
},
{
role: “user”,
content: “You are a PDF processing specialist…\n\n## Process\n1. Validate PDF exists\n2. Run pdftotext…”,
isMeta: true // HIDDEN from UI, sent to API
},
{
role: “user”,
content: {
type: “command_permissions”,
allowedTools: [“Bash(pdftotext:*)”, “Read”, “Write”],
model: undefined
}
}
]
}1
2
3
4
5
6
7
8
9
10
11
12
13
14
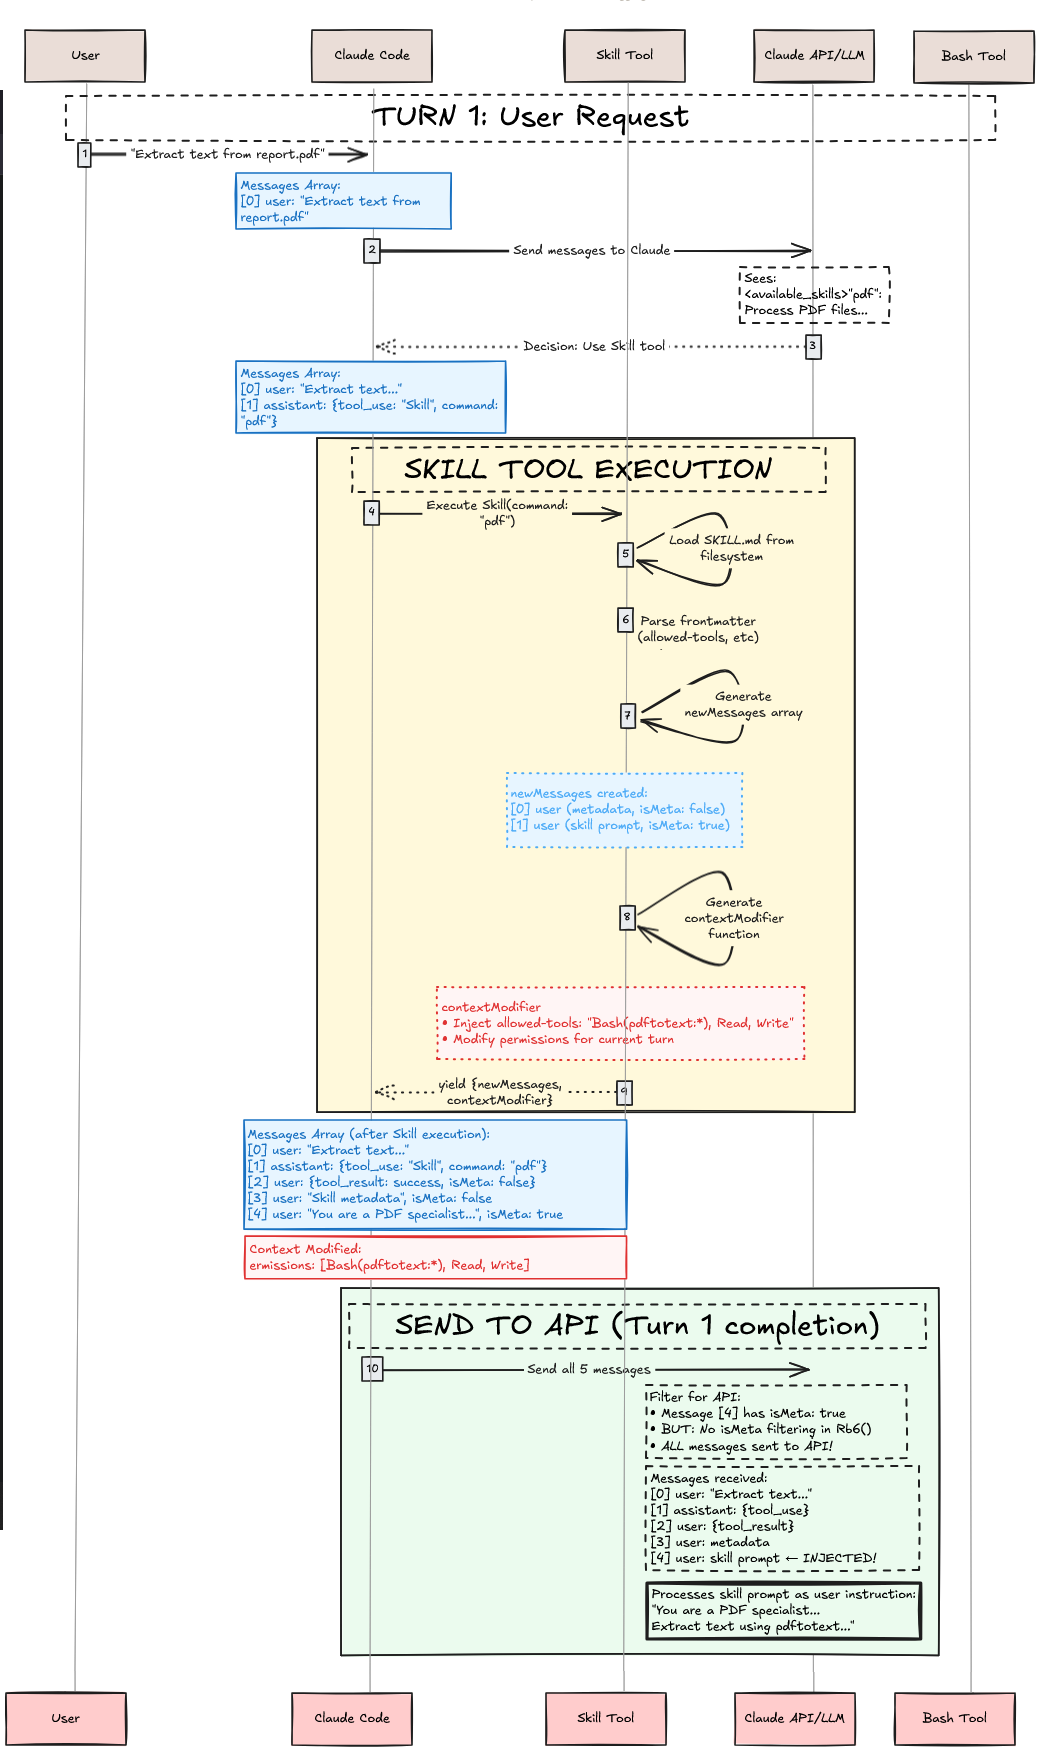
这里展示了到此为止发生的事情:执行上下文修改器被应用,预先批准 `Bash(pdftotext:*)`、`Read`、`Write`;请求被发送到 Anthropic API。至此 skill 工具执行结束。如果这是普通工具就结束了,但 skills 不同——它们只注入了对话与执行上下文,所以还需要在这些上下文下再次调用 Claude 来完成用户请求。
### Phase 5:Bash 工具执行(带 Skill 上下文)
Claude 接收带注入上下文的 API 响应,skill prompt 改变了 Claude 的行为,提供:
- 专门的 PDF 处理指令(对话上下文)
- 预批准的 `Bash(pdftotext:*)`、`Read`、`Write` 权限(执行上下文)
- 清晰的执行流程(对话上下文)
Claude 按 pdf skill 的流程执行:
I’ll extract text from report.pdf. Let me process the file.
[Following pdf skill’s instructions]
- Validate that report.pdf exists
- Run pdftotext command to extract text
- Read the output file
- Present the extracted text to you
1
2
Claude 使用 Bash 工具(已预批准,无需用户确认):
{
“type”: “tool_use”,
“id”: “toolu_456def”,
“name”: “Bash”,
“input”: {
“command”: “pdftotext report.pdf output.txt”,
“description”: “使用 pdftotext 从 PDF 中提取文本”
}
}1
2
3
4
5
6
7
8
9
10
11
12
13
14
15
16
17
18
19
20
21
22
23
24
25
26
27
28
29
Bash 成功执行,返回结果。Claude 再用 Read 读取输出文件并把提取文本呈现给用户。通过注入指令与修改工具权限,skill 成功引导 Claude 完成专业的 PDF 提取流程。

# 结论:心智模型总结

Claude Code 中的 skills 是基于提示词的对话与执行上下文修改器,通过元工具架构运行:

**关键要点**:

1. Skills 是 `SKILL.md` 中的提示模板,而非可执行代码
2. Skill 工具(S 大写)是工具数组中的元工具,用于管理各个 skill,不在 system prompt 中
3. Skills 通过注入指令提示(`isMeta: true`)修改对话上下文
4. Skills 通过更改工具权限与模型选择修改执行上下文
5. 选择 skill 的过程由 LLM 推理完成,而非算法匹配
6. 工具权限通过执行上下文修改进行范围限定
7. 每次调用 skill 会注入两条用户消息:一条用户可见元数据,一条隐藏指令发给 API

**优雅的设计**:把专用知识作为“修改对话上下文的提示词”,把权限作为“修改执行上下文的元信息”,而不是执行代码,使 Claude Code 获得了传统函数调用难以兼得的灵活性、安全性与可组合性。

# 参考资料

- Introducing Agent Skills
- Equipping Agents for the Real World with Agent Skills
- Claude Code Documentation
- Anthropic API Reference
- Official Documented Frontmatter Fields
- Internal Comms Skill
- Skill Creator Skill
- ChatGPT 5 System Prompt (leaked, not official)
@article{
leehanchung_bullshit_jobs,
author = {Lee, Hanchung},
title = {Claude Agent Skills: A First Principles Deep Dive},
year = {2025},
month = {10},
day = {26},
howpublished = {\url{https://leehanchung.github.io}},
url = {https://leehanchung.github.io/blogs/2025/10/26/claude-skills-deep-dive/}
}`